Drywall Installation Naperville is a popular DIY project that can add value to your home and save you money on a professional installation. Before starting, consider windows, doors, and electrical boxes when planning your layout.
You should also have a solid understanding of construction blueprints, building codes, and regulations. Collaboration and communication skills are also helpful as you work with other construction professionals.
Drywall installation can be a challenging project for homeowners, especially those with limited experience. It requires attention to detail, patience and a can-do attitude. But with the right preparation, even beginners can hang drywall and achieve professional-looking results.
Start by measuring the area where you will be installing drywall to determine how many sheets of material you’ll need. Then add 20 percent to that number to account for any material waste. Purchase the appropriate amount of drywall for your project at a home improvement store or online. Some stores allow customers to cut sheets down to size on the spot, which can save time and money.
Before you begin installing drywall, clear the space to make sure there’s nothing blocking or impeding your work. Use a level and a straight edge to ensure the framing of the wall or ceiling is flat from one stud or joist to another. If the framing is uneven, it can lead to bowing panels that create strange contours in your walls and ceilings.
Next, cover any surfaces that you don’t want to get drywall dust on with plastic sheeting or drop cloths. This will protect the floors, furniture and fixtures in the area. You may also want to wear a mask and protective eyewear to prevent drywall dust from irritating your lungs and eyes.
When you’re ready to begin hanging the drywall, prepare your workspace by setting up a ladder, if needed, and putting on a pair of safety glasses. Begin by measuring the length and width of the room to find out how large a sheet of drywall you’ll need. Make a diagram of your layout, or use a T-square to mark the locations where you’ll need to cut your drywall sheet. You can make these cuts before starting the project to ready your materials, or you can cut them as you go along, which is more time-consuming but often results in fewer mistakes. Use a keyhole saw or circle cutter to cut out spaces for switches and outlets as needed.
After cutting your drywall, you’ll need to apply a layer of joint compound to the seams and screw holes. Joint compound is typically referred to as mud or drywall putty. It’s important to spread a thin, even coat of the product over all the joints and screw holes, so there are no bumps or hollow spots in your walls or ceilings. Then, once the mud has dried, you can sand it down to a smooth surface with medium- and fine-grit sandpaper.
Cut the Sheets
The drywall installation process is not difficult, but it requires careful attention to detail and a steady hand. You can make mistakes if you don’t plan ahead, and the wrong tools or materials can be expensive. To prevent mistakes, measure the space and mark where you will cut each sheet of drywall before starting work. This will help you avoid waste and save time by ensuring that the pieces are the right size. It’s also important to get a good quality, sharp utility knife for scoring the drywall. The score should be fairly deep, at least 1/8 inch. After you score the drywall, it will snap easily along the line. You can then use pliers to pull the piece out of place and cut away the back paper.
If you are doing the drywall for the entire ceiling or walls, you can make most of your cuts before starting to minimize waste. You can also cut the pieces as you go, but this may be more time consuming. If you do choose to cut the drywall as you go, consider renting a drywall lift or asking a friend to help out. This will ensure that you can move the heavy sheets around safely.
Once the drywall is in place, you will need to tape and apply joint compound. This will create a smooth surface that is ready for painting or wallpaper. It’s important to use a premixed all-purpose joint compound and drywall tape. Drywall tape comes in both paper and mesh varieties, but paper is generally preferable as it is stronger and more durable.
Occasionally, you will have to repair small holes or dents in the drywall. These can be caused by impact from people or objects, or by nail or screw punctures. Repairing drywall damage is relatively simple, but you will need to patch and sand the area.
It’s also important to be careful when driving screws in drywall. You want to avoid breaking through the gypsum core or tearing the paper backing. You should also drive the screws into the studs and strapping rather than just into the wood.
Hang the Sheets
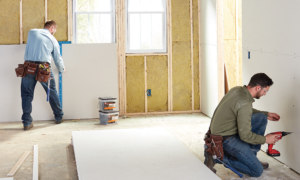
A good drywall job depends on correctly hanging the sheets. This step is often left to professionals, but it’s a project most DIYers can do with some training and a few helpers. Hanging drywall correctly ensures that your finished work will look great.
Start the job by determining how many square feet of area you need to cover with your drywall. This will help you figure out how much drywall to buy. The standard drywall size is 4-by-8-foot panels that each cover 32 square feet of wall space. If you have any windows or doors, subtract the areas they occupy from your total wall area before dividing by the number of 8-foot drywall panels.
Decide whether you’ll be hanging your drywall vertically or horizontally. Commercial jobs typically require drywall to be hung vertically because of fire codes. However, residential walls can be hung either way. The advantage to a horizontal installation is that it creates fewer seams, which means less taping.
Position your first sheet, making sure it is tight against the walls or ceiling. Screw it in place using the studs that it is attached to as a guide. For the first few rows, be careful not to drive screws into any electrical boxes or other items that will be covered by the drywall.
For subsequent rows, measure from the end of the previous panel to where you want your next to be installed. Make a mark on the new sheet at that point, then cut it 1/4″ shorter than the distance to be added. This will ensure that all of your seams are evenly spaced.
Repeat the process, ensuring that each row is aligned with the previous one. If you need to add a second panel of drywall above a previous one, make sure that it is the same length as the first one so that the seams line up and there are no gaps.
When you get to the last row, it’s a good idea to install one that will reach the floor. This will be especially important if you are going to install a tile or wood floor over the drywall.
Finishing
Once the drywall is securely in place, the installer must conceal the seams between sheets and cover any screw holes. This is called taping and mudding. The process requires patience, careful attention to detail and a lot of practice, but it’s a doable project for the DIY homeowner with the right tools. Some of the main supplies are a drywall putty knife (or taping knife) in a variety of sizes, drywall tape (paper or fiberglass), premixed joint compound and sandpaper. In addition, you may want a swivel-head pole sander with medium and fine grit paper, as well as safety glasses and a dust mask to protect your eyes and lungs from the drywall mud.
The first step in this process is applying a layer of joint compound, sometimes called mud, to the entire surface. Then, a strip of drywall tape is placed over the wet mud. More layers of mud are then applied over the tape, each time feathering it out to make the edges invisible. When finished, the resulting surface is smooth and ready for painting or wallpaper.
It’s important to plan out the layout of your drywall before starting work. In most cases, the drywall should be hung in rows. This will help reduce the number of unsightly seams that will show up after painting. Be sure to account for windows, doors, electrical boxes and other obstructions that will need to be cut around.
Another important consideration is how the drywall will be secured to the framing. Drywall screws are preferable over nails, as they won’t cause any damage to the drywall and are more likely to hold up against moisture. The drywall should be screwed to the studs and strapping at least every eight inches, or at least once per row.
When installing drywall in historic buildings or other spaces with complex angles or curves, it’s especially important to follow these tips for an accurate and professional result. By using the proper preparation techniques, carefully measuring and cutting, staggering seams, kerfing for curves and meticulous mudding and taping, even complicated framing projects can be completed with a high degree of quality.