Cabinet Refinishing San Jose CA is a cost-effective alternative to replacing your existing cabinets. It’s also eco-friendly and can be done in a shorter period of time. However, it limits your style options and isn’t ideal for addressing damage or structural problems.
This project requires thorough preparation to ensure your new finish adheres properly. This includes sanding between coats and vacuuming to remove dust and dirt from the surface.
Cabinet refinishing is a quick, budget-friendly way to update your kitchen. It is 70% cheaper than replacing your cabinets and requires less waste than a full cabinet replacement project. But before you get started with this DIY project, make sure your cabinets are in good condition and ready for the process. If you notice any signs of mold or water damage, it’s best to call a professional for a more extensive repair or replacement.
Start the preparation process by removing all cabinet doors, drawers, and hardware. Place them in a safe location to be reinstalled later. Once the cabinetry is empty, clean the surface using a degreaser to remove any grease or grime build-up. This step is especially important around stoves and handles, as these areas tend to accumulate the most grease and oils from hands.
The next step is sanding the surface. This is a critical step because it provides the foundation for your new finish. If you skip this step, you will have problems with your cabinets in the future. It’s also very important to use a high-quality sanding sponge or an orbital sander to prevent damaging the wood underneath. Be sure to vacuum the area after each sanding session and use a tack cloth to remove any lingering dust particles.
Then, you’ll want to prepare the cabinetry for painting. This involves applying a primer. This will help the new paint adhere to the surface and block stains. Then, you’ll need to sand the surface again to create a smooth, even surface before you apply your final coat of paint. Be sure to follow the instructions on your chosen brand of paint to ensure a proper application.
Stripping
Cabinet refinishing is an excellent way to give your kitchen a facelift without the expense of a complete replacement. But before you can refinish your cabinets, you’ll need to remove the existing finish using chemical peels or lots of sanding. This can be a messy and time-consuming process, but it’s important for ensuring that the new stain or paint will adhere properly to your cabinets.
Start by prepping your work area and removing any hardware from the cabinet doors. This includes the knobs, handles, and pulls. Make sure to keep the hardware in a safe place so you can reinstall it after your project is completed. Next, use a mild cleaner to wipe down the cabinet surfaces and remove any grease or grime. Once the surface is clean, let it dry completely before proceeding.
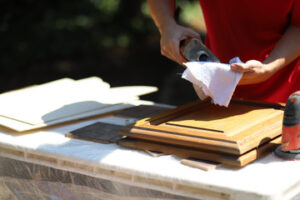
Once your workspace is prepped and ventilated, you can begin the stripping process. This is usually done with a chemical remover, but can also be done via hand-sanding. You’ll want to wear gloves, open windows, and follow all safety instructions.
Then, carefully pour a small amount of the stripping product onto a rag and start scrubbing. Work slowly and thoroughly, making sure to cover the entire surface. Pay special attention to any areas where the old finish was chipping or peeling. After you’ve stripped the entire cabinet, sand down the surfaces to prepare them for staining or painting.
If you’re looking for a professional to help you with your cabinet refinishing, contact N-Hance today. We have more than 500 locations nationwide and provide a fast, free estimate at your home. We value our customers and take great care to be respectful of their home during a remodel.
Primer
When you’re ready to get started on your cabinet refinishing project, the first step is to apply a high-quality primer. This provides a smooth base that promotes adhesion and helps the topcoat blend in evenly. A high-quality paint primer can also help protect the cabinets from moisture, which can cause peeling or warping over time. When choosing a primer, look for one that is water-based and low in VOCs (Volatile Organic Compounds) to keep your workspace clean and free of toxic fumes while you work.
Once the primer has dried, you can begin sanding the cabinet surfaces again to remove any rough spots or old finishes. Once you’ve finished sanding, make sure to use a damp cloth or tack pad to remove any excess dust and dirt from the surface.
This step is important because it allows the topcoat to adhere well and hide any small imperfections that could be visible once your new finish goes on. It’s also a great opportunity to fix any scratches, dents or gouges on your cabinetry with wood filler and sand again until the surface is smooth and even.
Now it’s time to apply your chosen cabinet finish! NHance offers several options for cabinet painting, including semi-gloss and satin finishes that are easy to wipe clean and great at hiding minor scratches and dents. If you’re looking for a more dramatic change, we also offer our Color Shift process, which involves hand-applying several coats of color to your cabinets’ wooden surfaces for a darker hue.
Paint
After all the sanding, cleaning, and prep work are done it’s time to apply the cabinet paint. Start with a high quality latex primer to promote adhesion and help block any stains that might show through the finished product. When applying the primer, be sure to follow the wood grain and lightly sand between coats for a smooth finish. If you decide to go with an oil-based primer, choose one that’s low odor and allows for ventilation in your kitchen to avoid fumes while painting.
When applying the topcoat, use a roller for speed and a brush for detail work. If you’re using a roller, make sure to back-brush between coats to level the surface. It’s also important to keep a wet edge to prevent visible paint lines. Always apply a second coat after the first to get even coverage and to ensure your finish is durable.
If you’re going with an alkyd paint (like the enamel-style used on older cabinets) or oil-based paint, clean the surfaces thoroughly with a degreaser solution before applying any products. These chemicals cut through the oils and grease found in most kitchens and will result in a more durable, longer-lasting finish.
Once your final coat is dry, it’s time to reinstall the doors, drawers and hardware. Referring to your labeling system should help you return all the pieces to their proper spots. Enjoy your new, upgraded kitchen!
Finish
Refinishing is an effective and affordable way to update your kitchen cabinets. It can be done on your own or with the help of a contractor and typically takes a day or two for a typical cabinet.
A new stain can enhance the look of your existing solid wood or veneer doors and cabinets. Stains seep into the natural grain of the wood and darken it while adding rich color tones. Stains can be used on solid wood and MDF/HDF materials, but will not work on laminates. A stain can be applied with a brush or sprayer. Several coats will be required to achieve the desired effect.
Another option is to paint your cabinets. While this option can be effective, it is best left to a professional contractor with experience in kitchen refinishing and the proper tools. The type of acrylic paint most homeowners buy from a home improvement store is not designed for cabinets and will not hold up over time. Often a year or more down the road the paint will begin to break down causing chips and peeling. This is not only an aesthetic issue, but it can also damage the cabinet doors over time and result in moisture build up causing rot and mold.
Cabinet refacing can cost more than refinishing, but it provides an entirely new appearance to your kitchen and can dramatically improve your home’s value. Unlike refinishing, refacing involves changing the entire cabinet structure with new gable ends, boxes, styles, and doors. Refacing professionals usually use high quality products with solid wood and wood veneers which provide better durability versus low grade laminates that can chip and delaminate over time.